在 Nvim 中 debug Java
环境
- 8-core 16GB M1 Pro, 14” MacBook Pro
- Mac OSX version 12.5.1
- AstroNvim v3.37.7
前情提要
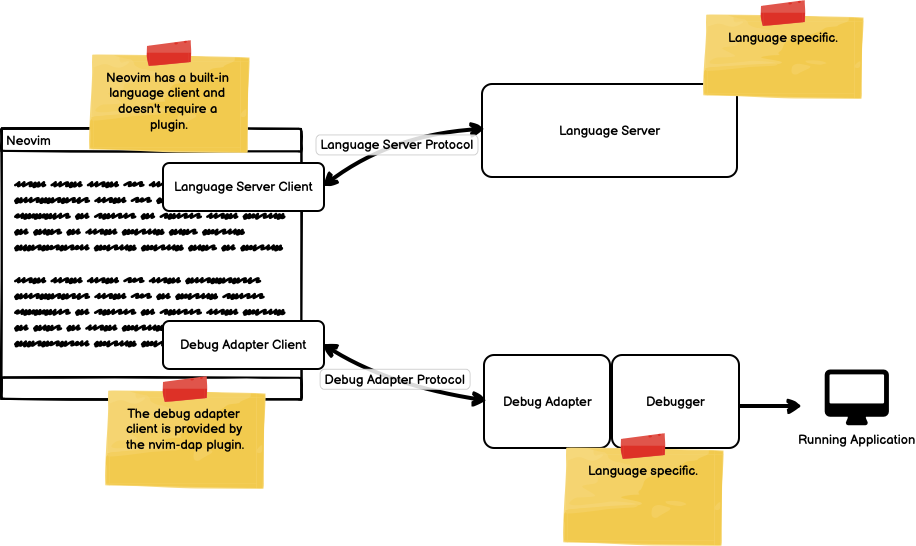
1.什么是 LSP(Language Server Protocol) ?
IDE 具备很多好用的功能,如代码补全、转到定义、查找引用、悬停文档等等。传统上,每个开发工具都得重复实现这些功能。而现在,利用语言服务器(LS)提供这些功能,可以让这些功能得以复用。为了实现开发工具和语言服务器之间的解耦,LSP 应运而生,它标准化了开发工具和语言服务器(LS)之间的通信方式。这样,单个语言服务器(LS)可以在多个开发工具中重用。这是语言提供商和工具供应商的双赢。
2.什么是 DAP(Debug Adapter Protocol) ?
和上面的 LSP 一样,为了实现开发工具和调试器、运行时之间的解耦,DAP 将开发工具的调试支持和调试器、运行时通信的方式抽象为协议。调试适配器(DA)使调试器、运行时适应 DAP,实现开发工具和调试器、运行时之间的通信。
DAP-Client ----- Debug Adapter ------- Debugger ------ Debugee
(nvim-dap)  |   (per language)  |   (per language)    (your app)
            |                   |
            |        Implementation specific communication
            |        Debug adapter and debugger could be the same process
            |
     Communication via the Debug Adapter Protocol
3.获取 LSP、DAP 功能,Nvim 需要安装哪些插件 ?
Nvim 内嵌 LSP 客户端,因此不必安装。需要安装的为语言服务器,DAP 客户端,调试适配器,调试器。
针对 Java,需要安装的插件为jdtls(语言服务器),nvim-jdtls(jdtls的nvim插件),nvim-dap(DAP客户端),java-debug(调试适配器), vscode-java-test
🔧安装 Eclipse JDT Language Server
📄官方文档 👉 https://github.com/eclipse-jdtls/eclipse.jdt.ls#installation
文档中说明,安装方式有通过下载并解压官方提供的文件、某些Linux发行版下使用包管理器以及通过源码构建。
因此,针对本环境,主要有以下几种方式 ⬇️
下载 milestone
🔗 https://download.eclipse.org/jdtls/milestones/?d
# 创建workspace目录,后面会用到
mkdir -p ~/.local/share/nvim/lsp/jdt-language-server/workspace/folder
cd ~/.local/share/nvim/lsp/jdt-language-server
# 下载jdt-language-server-xxxxx.tar.gz
wget https://download.eclipse.org/jdtls/milestones/1.9.0/jdt-language-server-1.9.0-202203031534.tar.gz
# 解压
tar -zxvf jdt-language-server-1.9.0-202203031534.tar.gz
homebrew 安装
brew install jdtls编译源码
git clone https://github.com/eclipse-jdtls/eclipse.jdt.ls.git
cd eclipse.jdt.ls
# 此命令将服务器构建到 ./org.eclipse.jdt.ls.product/target/repository 文件夹中
./mvnw clean verify -DskipTests=true
语言服务器需要 Java17 运行时环境才能运行,在构建前需要设置好 JAVA_HOME
JAVA_HOME=/path/to/java/17https://neovim.io/doc/user/mason 安装
为了方便统一管理,推荐使用 mason 进行安装mason 为AstroNvim自带插件,若不使用AstroNvim,也可自行安装该插件
打开 mason 后,搜索 java,在 lsp 中选择唯二插件中的 jdtls 即可完成安装
安装位置可以通过
:h standar-path命令找到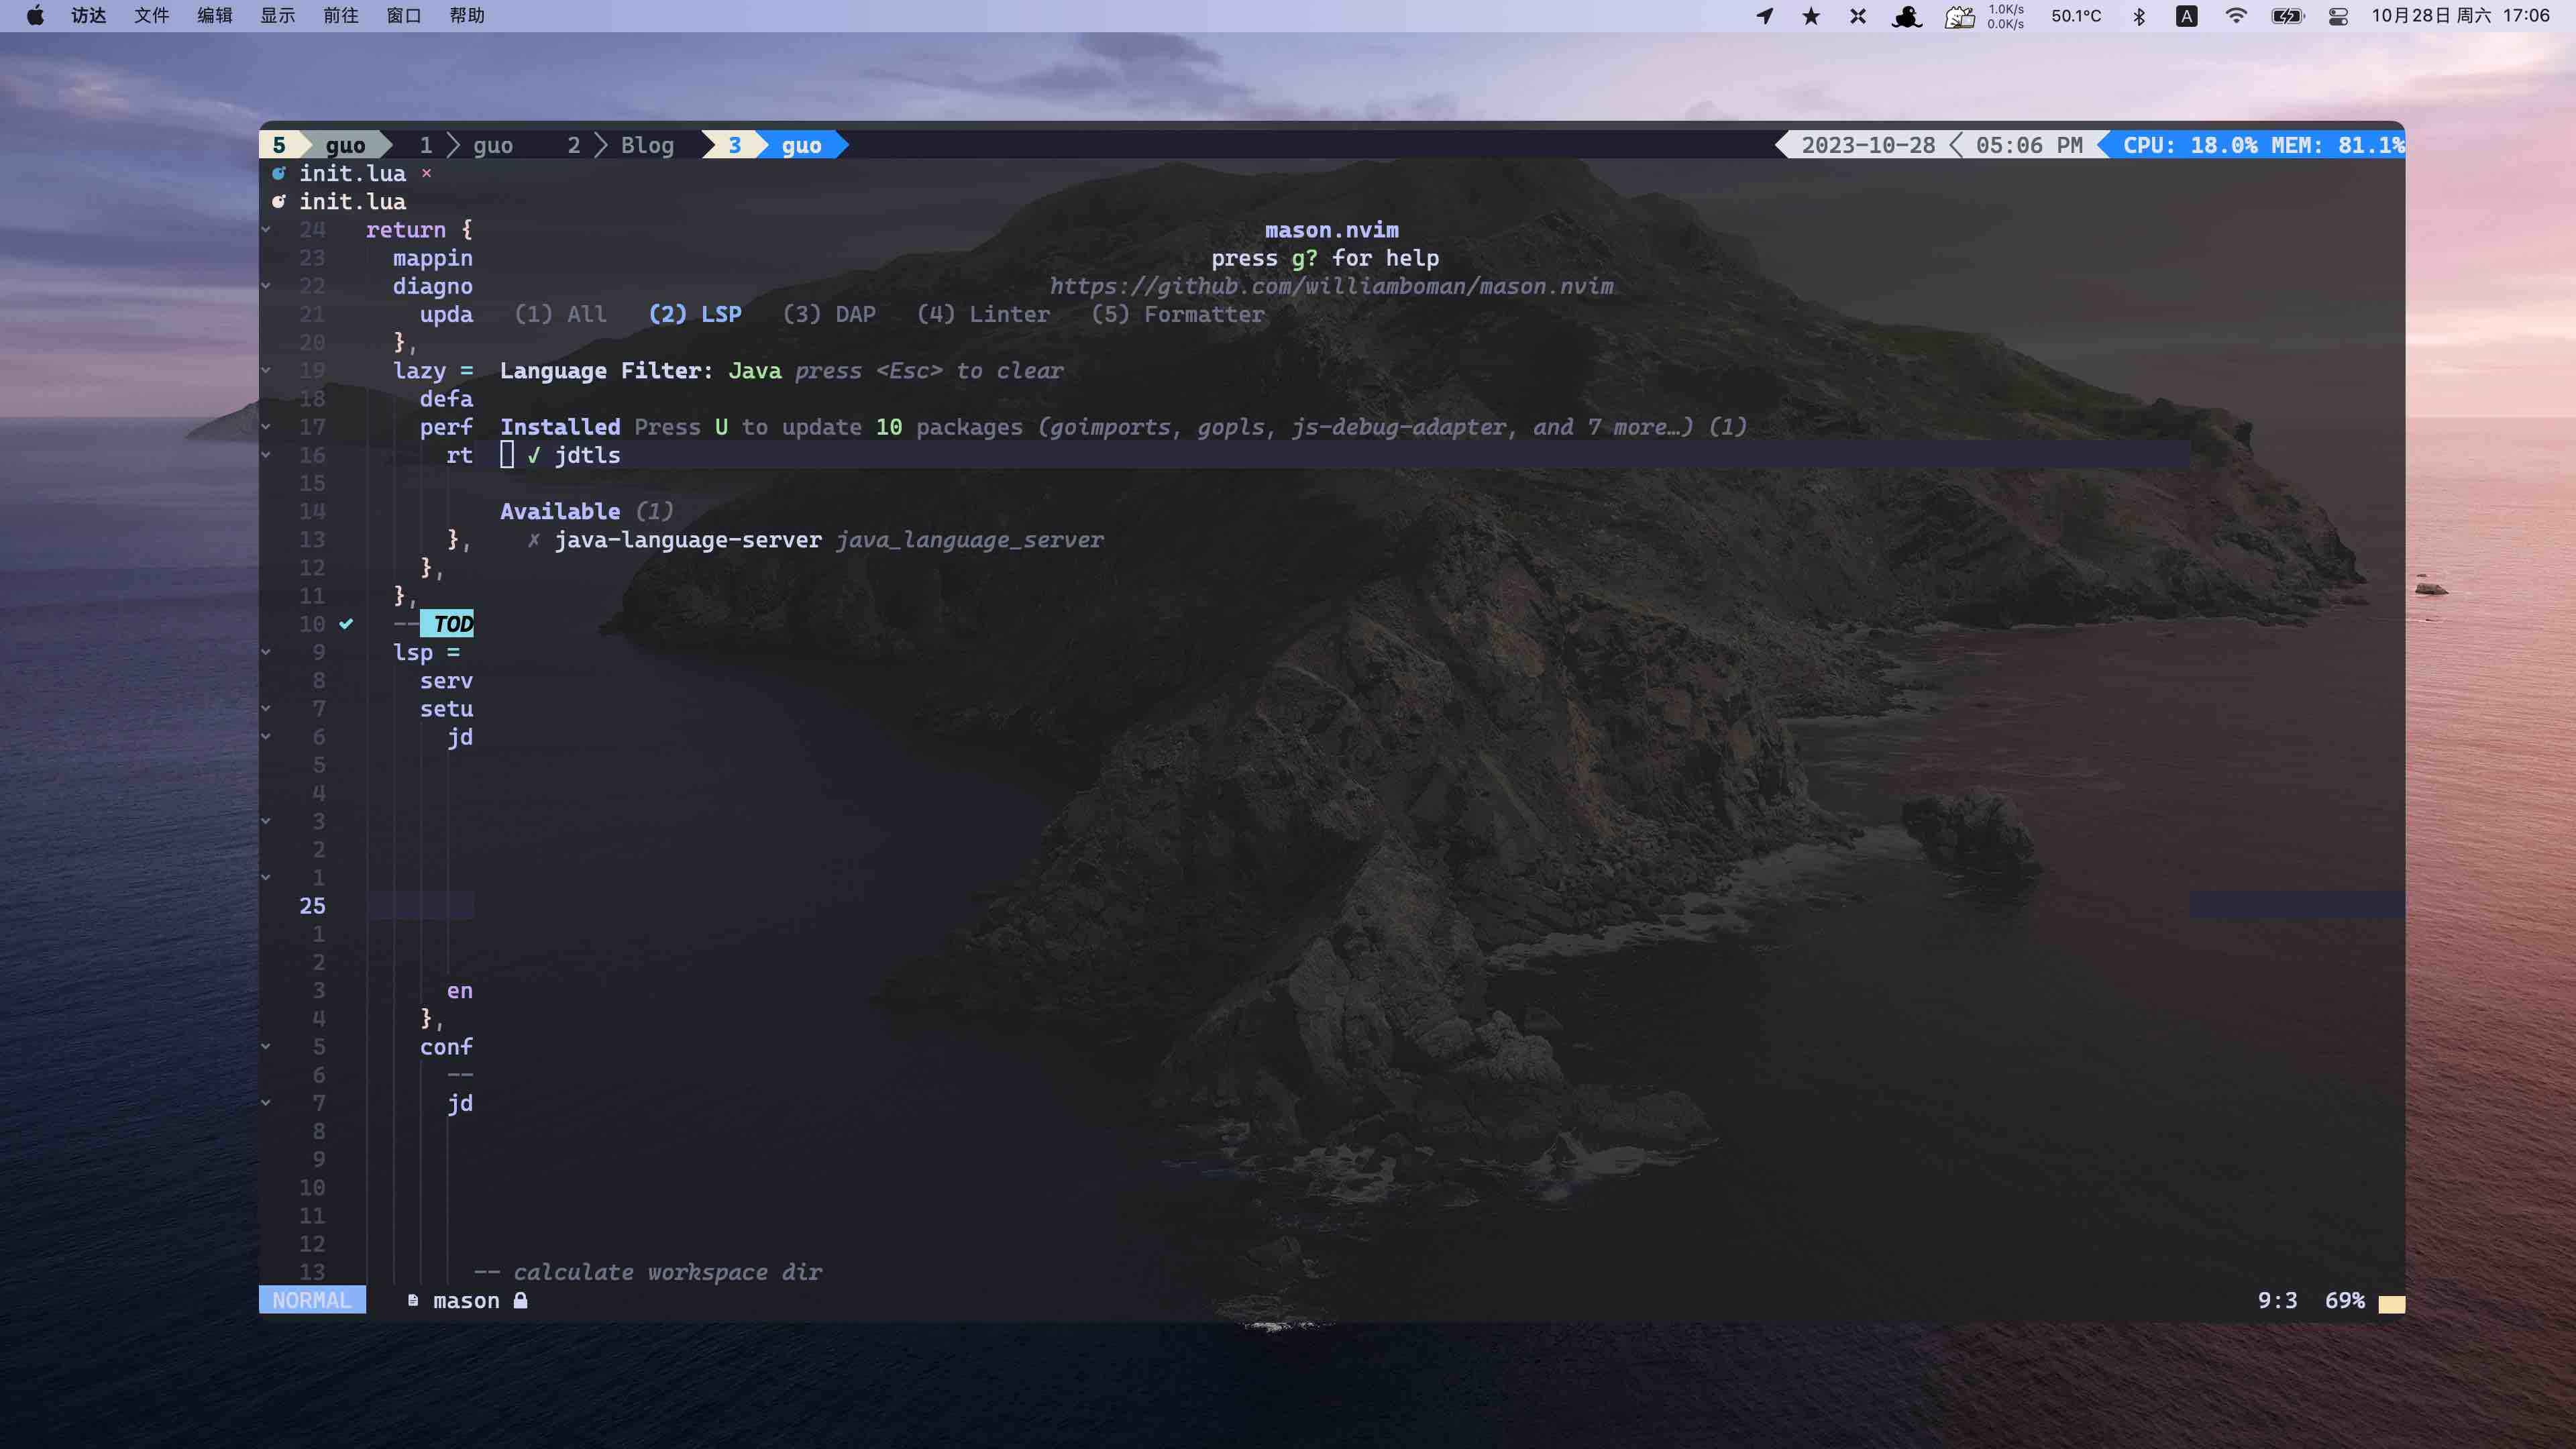
配置nvim-jdtls
使用 JDT Language Server ,需要配置 Nvim 内嵌的 LSP 客户端,共有两种方案。其一是 nvim-jdtls ,另一种是 nvim-lspconfig。
📄nvim-jdtls 👉 https://github.com/mfussenegger/nvim-jdtls#configuration-quickstart
📄nvim-lspconfig 配置方案 👉 links
┌────────────┐           ┌────────────────┐
│ nvim-jdtls │           │ nvim-lspconfig │
└────────────┘           └────────────────┘
     |                         |
    start_or_attach           nvim_lsp.jdtls.setup
     │                              |
     │                             setup java filetype hook
     │    ┌─────────┐                  │
     └───►│ vim.lsp │◄─────────────────┘
          └─────────┘
              .start_client
              .buf_attach_client
本文选择 nvim-jdtls 方案
安装
-- plugins/nvim-jdtls.lua
 return {
  "mfussenegger/nvim-jdtls", -- load jdtls on module
  {
    "williamboman/mason-lspconfig.nvim",
    opts = {
      ensure_installed = { "jdtls" },
    },
  },
}
配置
以下为 AstroNvim 给出一份配置模板。
-- init.lua
return {
  lsp = {
    setup_handlers = {
      -- add custom handler
      jdtls = function(_, opts)
        vim.api.nvim_create_autocmd("Filetype", {
          pattern = "java", -- autocmd to start jdtls
          callback = function()
            if opts.root_dir and opts.root_dir ~= "" then require("jdtls").start_or_attach(opts) end
          end,
        })
      end
    },
    config = {
      -- set jdtls server settings
      jdtls = function()
        -- use this function notation to build some variables
        local root_markers = { ".git", "mvnw", "gradlew", "pom.xml", "build.gradle" }
        local root_dir = require("jdtls.setup").find_root(root_markers)

        -- calculate workspace dir
        local project_name = vim.fn.fnamemodify(vim.fn.getcwd(), ":p:h:t")
        local workspace_dir = vim.fn.stdpath "data" .. "/site/java/workspace-root/" .. project_name
        os.execute("mkdir " .. workspace_dir)

        -- get the mason install path
        local install_path = require("mason-registry").get_package("jdtls"):get_install_path()

        -- get the current OS
        local os
        if vim.fn.has "macunix" then
          os = "mac"
        elseif vim.fn.has "win32" then
          os = "win"
        else
          os = "linux"
        end

        -- return the server config
        return {
          cmd = {
            "java",
            "-Declipse.application=org.eclipse.jdt.ls.core.id1",
            "-Dosgi.bundles.defaultStartLevel=4",
            "-Declipse.product=org.eclipse.jdt.ls.core.product",
            "-Dlog.protocol=true",
            "-Dlog.level=ALL",
            "-javaagent:" .. install_path .. "/lombok.jar",
            "-Xms1g",
            "--add-modules=ALL-SYSTEM",
            "--add-opens",
            "java.base/java.util=ALL-UNNAMED",
            "--add-opens",
            "java.base/java.lang=ALL-UNNAMED",
            "-jar",
            vim.fn.glob(install_path .. "/plugins/org.eclipse.equinox.launcher_*.jar"),
            "-configuration",
            install_path .. "/config_" .. os,
            "-data",
            workspace_dir,
          },
          root_dir = root_dir,
        }
      end,
    },
  },
  plugins = {
    "mfussenegger/nvim-jdtls", -- load jdtls on module
    {
      "williamboman/mason-lspconfig.nvim",
      opts = {
        ensure_installed = { "jdtls" },
      },
    },
  },
}
nvim-dap
由于本案使用 AstroNvim,有关 nvim-dap 及其扩展的安装和配置均已被 AstroNvim 完成,因此这部分不再赘述。
安装和配置 java-debug
Java Debug Server 是 VSCode 和 JVM 之间的桥梁。该实现基于 JDI(Java Debug Interface)。它作为 Eclipse JDT Language Server 的附加组件提供调试功能。
安装
安装可从以下方式中二选一。
mason 安装
打开 mason 后,搜索 java,在 dap 中选择唯二插件中的 java-debug-adapter 即可完成安装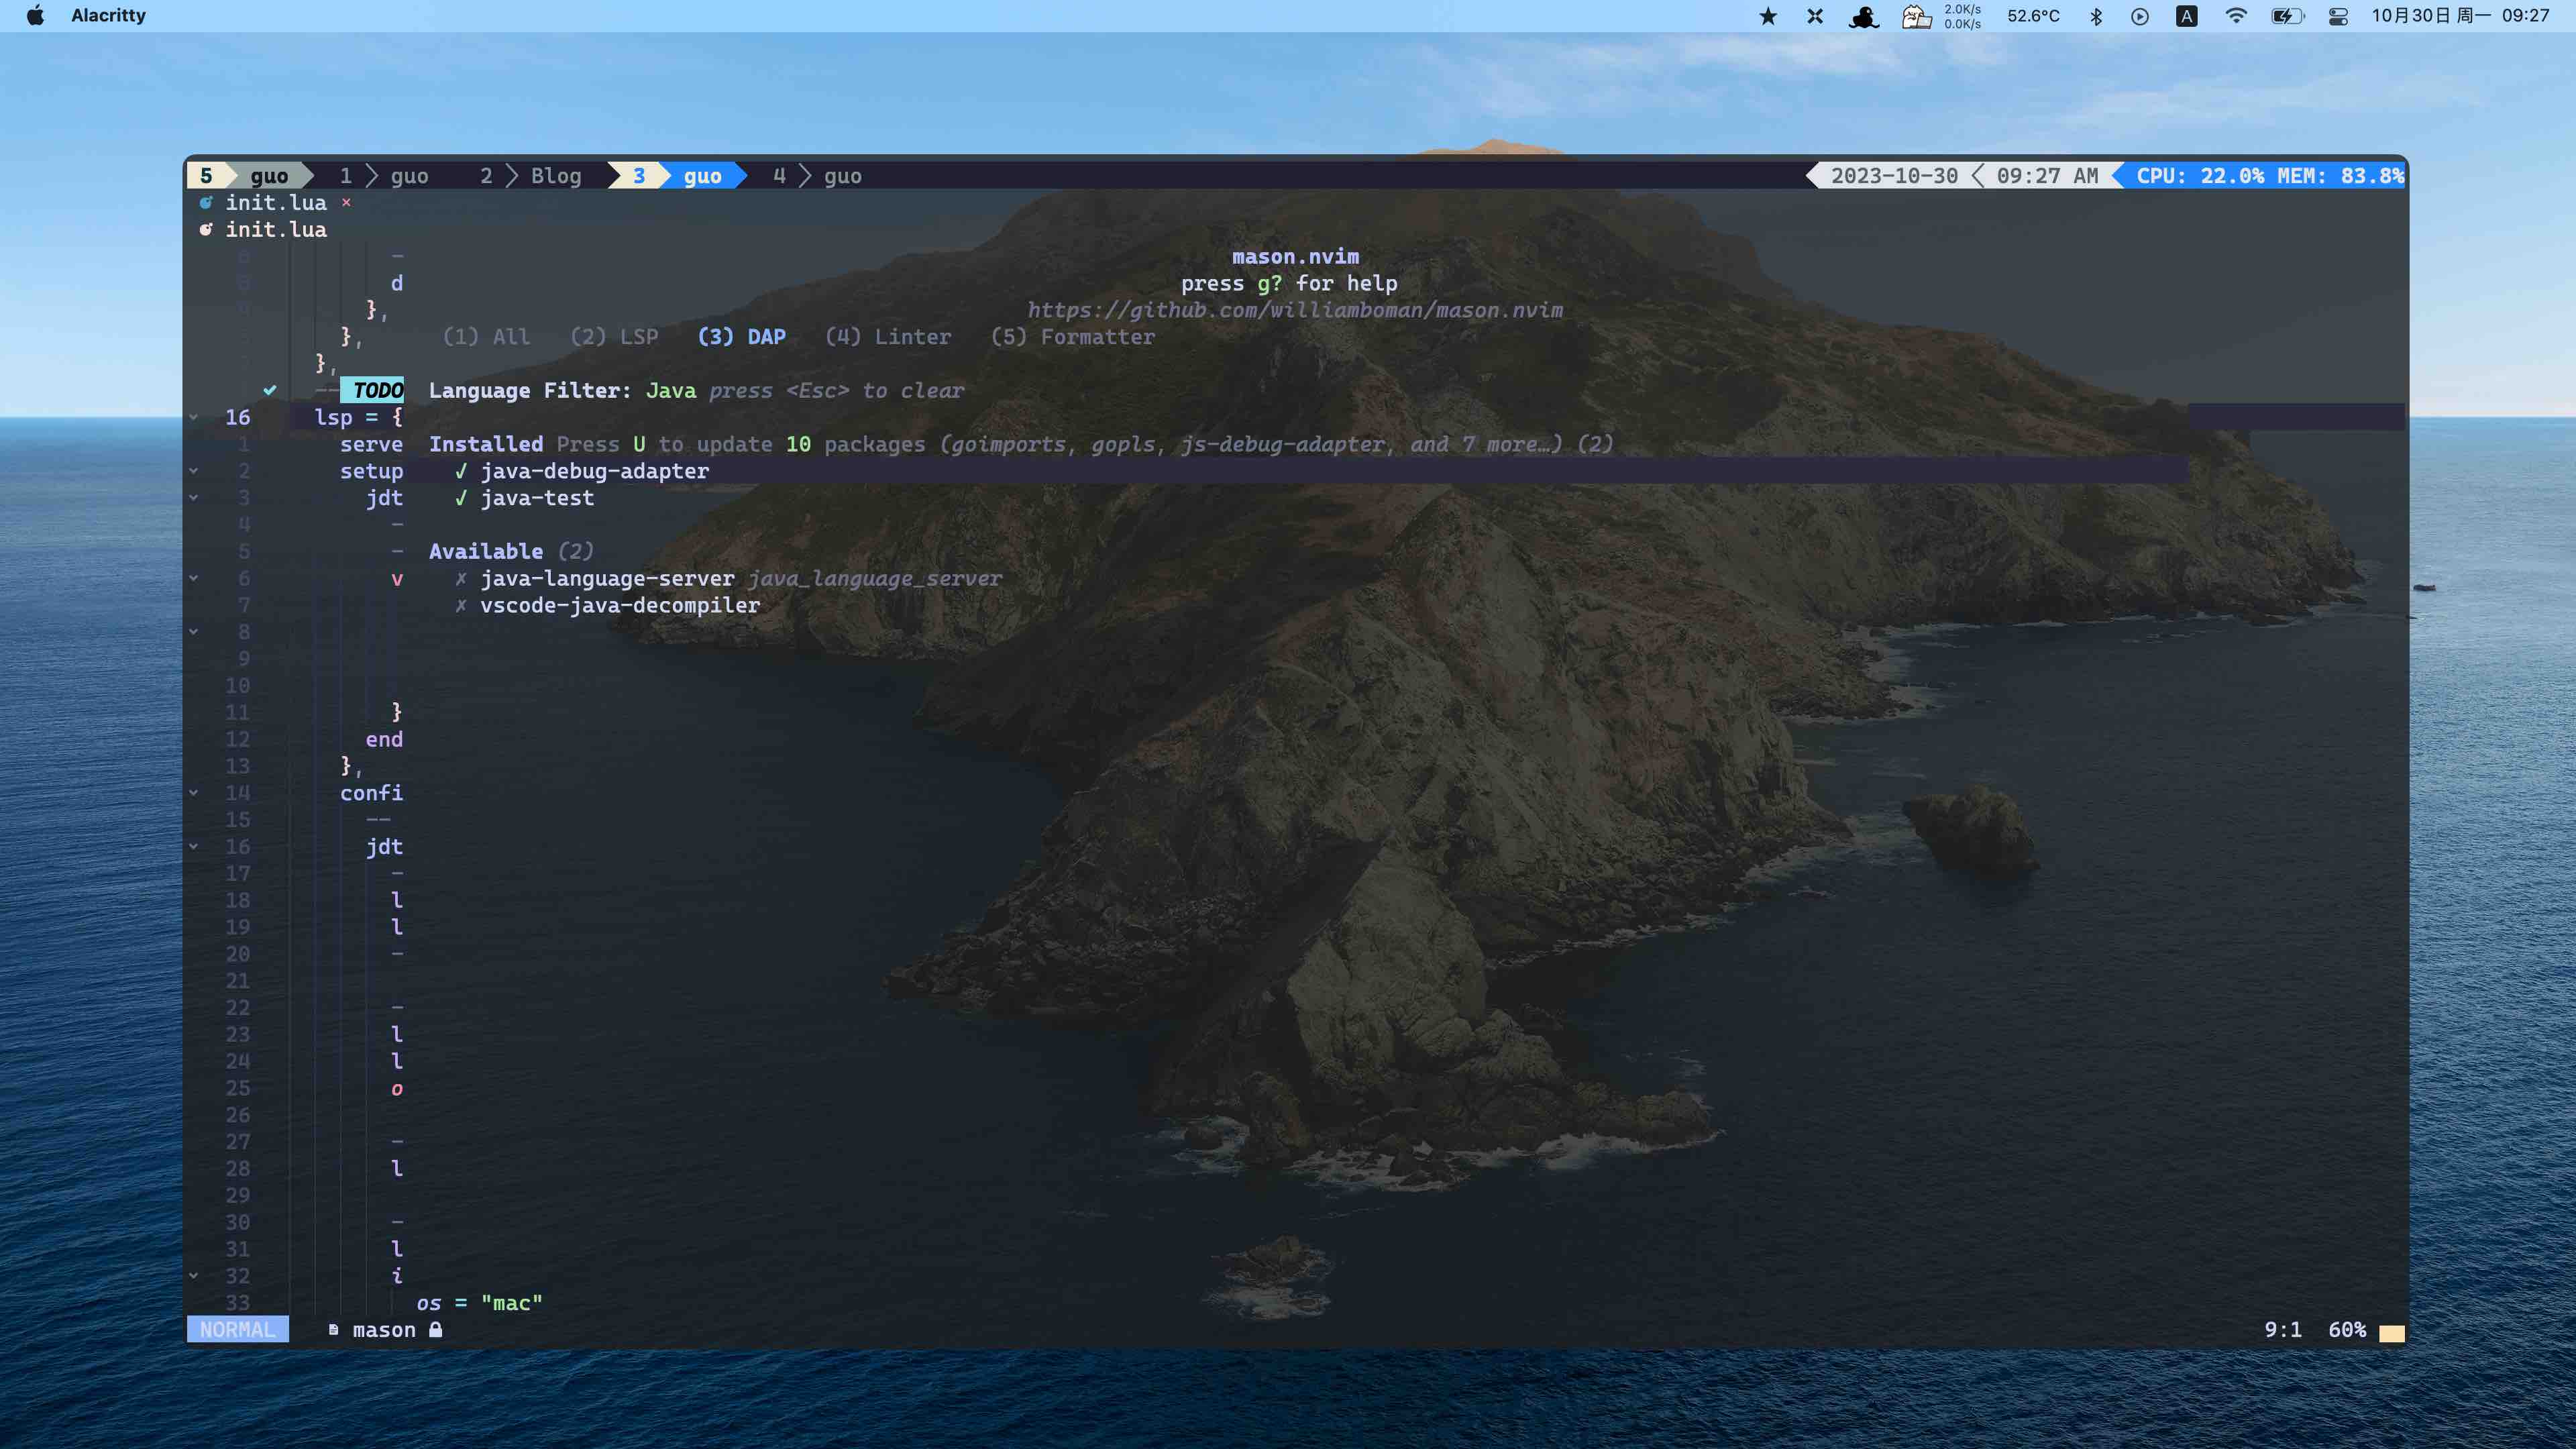
maven 安装
git clone https://github.com/microsoft/java-debug.git
cd java-debug
./mvnw clean install
配置
在 nvim-jdtls 的配置中加入 java-debug 拓展,并指向安装路径
-- init.lua
config['init_options'] = {
  bundles = {
    vim.fn.glob("path/to/java-debug/com.microsoft.java.debug.plugin/target/com.microsoft.java.debug.plugin-*.jar", 1)
  };
}
安装和配置 vscode-java-test
安装
git clone https://github.com/microsoft/vscode-java-test.git
cd vscode-java-test
npm install
npm run build-plugin
此安装过程可能会不太顺利,报错常与 maven 包下载和 jre 环境相关。
经过多次尝试,最终使用 jdk17 成功安装。
配置
在 nvim-jdtls 的配置中加入 vscode-java-test 拓展,并指向安装路径
-- init.lua
-- This bundles definition is the same as in the previous section (java-debug installation)
local bundles = {
  vim.fn.glob("path/to/java-debug/com.microsoft.java.debug.plugin/target/com.microsoft.java.debug.plugin-*.jar", 1),
};

-- This is the new part
vim.list_extend(bundles, vim.split(vim.fn.glob("/path/to/microsoft/vscode-java-test/server/*.jar", 1), "\n"))
config['init_options'] = {
  bundles = bundles;
}
键映射
nnoremap <A-o> <Cmd>lua require'jdtls'.organize_imports()<CR>
nnoremap crv <Cmd>lua require('jdtls').extract_variable()<CR>
vnoremap crv <Esc><Cmd>lua require('jdtls').extract_variable(true)<CR>
nnoremap crc <Cmd>lua require('jdtls').extract_constant()<CR>
vnoremap crc <Esc><Cmd>lua require('jdtls').extract_constant(true)<CR>
vnoremap crm <Esc><Cmd>lua require('jdtls').extract_method(true)<CR>


-- If using nvim-dap
-- This requires java-debug and vscode-java-test bundles, see install steps in this README further below.
nnoremap <leader>df <Cmd>lua require'jdtls'.test_class()<CR>
nnoremap <leader>dn <Cmd>lua require'jdtls'.test_nearest_method()<CR>
References
- AstroNvim Docs
- Neovim Docs
- nvim-jdtls sample configurations
- Kevin Sookocheff, Using Neovim as a Java IDE
- alpha2hpi, Neovim for Beginners — Java Debugging
- ITKEY_, neovim使用nvim-jdtls搭建Java IDE